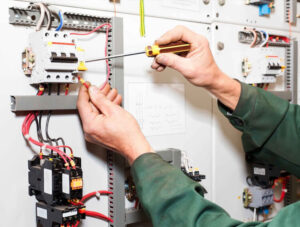
In today’s technology-driven workplaces, ensuring the safety and compliance of office equipment is essential. This comprehensive guide outlines the necessary procedures for testing and tagging of office equipment, including computers, monitors, printers, and photocopiers. By following these protocols, businesses can mitigate electrical hazards, comply with safety regulations, and maintain a secure working environment for all employees. Keeping office equipment regularly tested and tagged not only protects staff but also enhances the longevity and efficiency of the devices in use.
The following sections will provide detailed instructions on how to test and tag the specific items mentioned, equipping readers with the knowledge needed to maintain a safe and compliant workplace.
Computer
Ensuring the safety of computers in workplaces is vital, and this is where testing and tagging comes into play. Following the AS/NZS 3760:2022 Standard, computers, like other electrical appliances, must undergo routine inspections to confirm their safety and functionality. Computers are either Class I or Class II devices. Class I computers are earthed, meaning they have an additional layer of safety by connecting exposed conductive parts to the ground, reducing the risk of electrical shock. Class II computers, on the other hand, are double-insulated and do not have an earth connection, relying solely on robust insulation to prevent electrical faults.
Testing and tagging computers offer several benefits:
- Enhanced safety: Minimises the risk of electrical hazards such as shocks or fires, protecting users and the workplace.
- Compliance: Adheres to the AS/NZS 3760:2022 Standard, ensuring your business meets legal requirements.
- Fault detection: Identifies issues like insulation failures or excess leakage current, allowing for prompt maintenance.
- Preventive maintenance: Proactive testing can extend the lifespan of equipment by identifying faults early.

How to Test and Tag a Computer
To test and tag a computer, follow these steps:
- To test and tag a computer, the process must follow the guidelines outlined in the AS/NZS 3760:2022 Standard. Start with a visual inspection to check for any visible signs of wear or damage, such as exposed wires, broken plugs, or discolouration. The next step involves the insulation resistance test, which checks the integrity of the computer’s internal insulation to ensure it protects against electrical hazards.
- For Class I computers, an earth continuity test is performed to verify the proper connection between the exposed metal parts and the earth pin. This is critical for earthed devices to prevent potential electric shocks in the event of a fault. Both Class I and Class II devices should undergo an earth leakage test to measure any leakage current flowing from live parts to earth, which, if excessive, could indicate a fault.
- Once all tests are completed and passed, the final step is tagging. The tester attaches a tag to the computer’s power cord or plug, marking the date of testing, tester’s details, and the next scheduled test date.
Regular testing and tagging of computers ensure compliance with the AS/NZS 3760:2022 Standard while contributing to a safer workplace environment.
Monitor
Monitors are essential devices in workplace environments, and ensuring their safety through testing and tagging is vital. This process involves checking compliance with the AS/NZS 3760:2022 Standard, which specifies the necessary procedures for electrical equipment safety inspection and testing. Monitors are typically classified as Class I or Class II, depending on their construction. Class I monitors have basic insulation and require earthing, while Class II monitors have double insulation and do not require earthing. Testing and tagging a monitor ensures it operates safely, protects users from electric shocks, and prevents potential fires caused by electrical faults. Conducting testing and tagging not only complies with regulations but also provides peace of mind to businesses and individuals.

How to Test and Tag a Monitor?
To test and tag a monitor, follow these steps:
- Visual Inspection: Begin by visually inspecting the monitor for any external damage, such as frayed cables, damaged plugs, or cracks in the casing. Ensure there are no loose components that could pose a risk during operation.
- Electrical Testing: For Class I monitors, perform an earth continuity test to ensure proper earthing is in place. Then, carry out an insulation resistance test to verify the monitor’s insulation integrity. If the monitor is a Class II device, an earth test is not required, but an insulation resistance test is still necessary.
- Leakage Testing: Conduct an earth leakage test for Class I monitors. This test checks for any current leakage from the live components to the exposed metal parts, ensuring it does not exceed the allowable limits specified by the AS/NZS 3760:2022 Standard.
- Tagging: Once all tests are successfully completed, label the monitor with a tag that includes information such as the test date, technician’s details, and the next test due date. This tag certifies that the monitor has passed safety inspections according to the standards.
Regularly testing and tagging monitors is essential for ensuring their continued safety, particularly in commercial and industrial settings. This process helps minimise electrical hazards, offering a secure environment for users and extending the lifespan of the equipment.
Printer or Photocopier
Testing and tagging printers or photocopiers is a critical process in ensuring electrical safety, particularly in office and commercial environments where these devices are heavily used. Printers and photocopiers are typically classified as Class 1 electrical appliances, which means they require both earth continuity and insulation resistance tests under the AS/NZS 3760:2022 standard. These devices are often used frequently, making regular testing essential to prevent potential hazards such as electrical shocks or fires. Aside from safety, the benefits of testing and tagging include extending the lifespan of the equipment and ensuring compliance with workplace safety regulations. Regular testing and tagging can help detect early signs of wear and tear, reducing downtime and repair costs while promoting a safe working environment.

How to Test and Tag a Printer or Photocopier
To test and tag a printer or photocopier in compliance with the AS/NZS 3760:2022 standard, follow these steps:
- Visual Inspection: Start by inspecting the device for any visible signs of damage, such as frayed cords, cracked casings, or exposed wiring. Ensure that the power cord and plug are intact and that there are no signs of overheating or wear.
- Earth Continuity Test: For Class 1 devices, connect the Portable Appliance Tester (PAT) to check for continuity between the earth pin on the plug and any accessible metal parts of the printer or photocopier. This ensures proper grounding in the event of a fault.
- Insulation Resistance Test: Using the PAT, measure the insulation resistance between the active and neutral conductors. This test ensures that the insulation is functioning correctly and that there is no risk of electrical leakage.
- Functionality Check: Turn on the printer or photocopier to verify that it operates correctly without any unusual noises, faults, or malfunctions.
- Tagging: Once the device passes all tests, attach a tag that clearly indicates the test date, the technician’s details, and the next scheduled test. This ensures compliance with AS/NZS 3760:2022 and makes tracking future testing dates easier.
By following these steps, you can ensure that your printer or photocopier remains safe, compliant, and fully functional, providing peace of mind in any workplace setting.
Laptop Charger and Docking Station
Testing and tagging is a crucial safety procedure that ensures electrical equipment, including laptop chargers and docking stations, is safe to use. Under the NZS 3760 2022 standard, testing and tagging involve checking the integrity of electrical devices and ensuring they meet safety requirements.
Laptop chargers can be classified as Class 2 devices. Class 2 devices are double insulated and do not require earthing. Regular testing and tagging not only enhance workplace safety but also reduce the risk of electrical faults, ensuring that all electrical equipment is safe for use.

How to Test and Tag Laptop Chargers and Docking Stations
To test and tag a laptop charger or docking station, follow these steps:
- Visual Inspection: Begin with a thorough visual inspection of the charger and docking station. Look for any signs of wear and tear, such as frayed cables, cracked casings, or exposed wires. Ensure that both devices are clean and free from any foreign objects that could impede performance.
- Insulation Resistance Test: Perform an insulation resistance test to ensure there are no breakdowns in the insulation that could lead to electrical shocks. This test measures the resistance of the insulation and should ideally be above a minimum threshold, typically 1 MΩ.
- Polarity Test: Check the polarity of the charger and docking station to ensure that live and neutral connections are correct. This is crucial for the safe operation of both devices.
- Functional Test: Finally, plug the charger and docking station into a laptop and check that they operate correctly, charging the laptop without issues and facilitating connectivity to peripherals.
Once testing is complete, tag the charger and docking station with a label that indicates the date of testing, the name of the technician who performed the test, and the next due date for testing. Regular testing and tagging of laptop chargers and docking stations not only complies with safety standards but also promotes a safe working environment, ultimately protecting both employees and equipment.
By adhering to the NZS 3760 2022 standard for testing and tagging, organisations can ensure that their electrical equipment, including laptop chargers and docking stations, remains safe and compliant. This proactive approach mitigates the risk of electrical hazards, ensuring peace of mind for both employers and employees.
IEC Lead
IEC leads are commonly used to connect a wide range of electrical appliances, from computers and monitors to printers and other office equipment. Ensuring the safety and compliance of these leads is critical, particularly in workplaces where electrical hazards pose significant risks. Testing and tagging IEC leads involve verifying their compliance with the AS/NZS 3760:2022 standard, which governs the in-service safety inspection and testing of electrical equipment. This process checks for issues such as insulation resistance, earth continuity, and polarity, determining whether an item is classified as Class I (earthed) or Class II (double insulated). Testing and tagging help identify any potential hazards and ensure electrical safety in accordance with regulatory requirements. For businesses, this means safeguarding employees, reducing liability, and complying with workplace safety regulations. IEC leads fall under the category of Class I or Class II equipment, depending on the specific lead and its application.
How to Test and Tag an IEC Lead
To perform the testing and tagging process on an IEC lead, the following steps should be followed:
- Visual Inspection: Begin by conducting a thorough visual check of the IEC lead. Look for visible damage, such as cuts, exposed wires, or burns. Inspect the plug and the socket ends for any deformities or signs of wear.
- Insulation Resistance Test: This test determines the effectiveness of the insulation material around the conductors. Using an insulation tester, apply the required voltage and check for adequate resistance levels as per AS/NZS 3760:2022 standards.
- Earth Continuity Test: For Class I leads, you will need to test for earth continuity to ensure the protective earth connection is functional. This is typically done using a PAT tester.
- Polarity Test: This test ensures that the active, neutral, and earth wires are connected correctly within the plug. Reverse polarity could lead to safety hazards, so it’s important to confirm proper polarity using a PAT tester.
- Tagging the Lead: Once the tests have been completed, and the lead has passed, affix a durable and legible tag. The tag should include information such as the date of the test, the next due test date, the technician’s name, and the equipment’s status (whether it passed or failed).
By following these steps, IEC leads can be tested and tagged according to the test and tag standard, ensuring they are safe for continued use. This process is critical for maintaining electrical safety and compliance in any workplace where IEC leads are used.
Extension Lead
Testing and tagging extension leads is an essential practice to ensure the safety of electrical equipment in both domestic and commercial environments. This process involves assessing the lead for any potential electrical faults, ensuring it adheres to the AS/NZS 3760:2022 Standard for in-service safety inspection and testing. Extension leads typically fall under Class I equipment, meaning they require both an earth connection and insulation testing. Various types of extension leads are used depending on the length, power rating, and environment they are being used in. Proper testing and tagging ensure that these leads are safe to use, protecting against electrical shock, equipment damage, and fire hazards. The benefits of testing and tagging extension leads include minimising risks of electrical faults, prolonging the life of the equipment, and ensuring compliance with workplace safety regulations.

How to Test and Tag Extension Leads
When testing and tagging an extension lead, it is critical to follow the proper procedure to ensure compliance with the AS/NZS 3760:2022 Standard. The process involves several key steps:
- Visual Inspection: Check the entire length of the lead for any visible signs of damage, such as cuts, abrasions, or exposed wires. Ensure the plug and socket ends are in good condition and that there are no loose connections.
- Earth Continuity Test: Since most extension leads are Class I devices, an earth continuity test is essential. This test ensures the lead’s earth connection is intact and capable of protecting users from electrical faults.
- Insulation Resistance Test: The insulation resistance test checks for any faults in the lead’s insulation. This ensures there are no unintended pathways for current that could lead to shock or equipment damage.
- Polarity Check: Ensure the live, neutral, and earth wires are correctly connected within the plug and socket. Incorrect polarity can cause malfunctions or pose serious safety risks.
- Tagging: Once these tests are completed and the extension lead passes all checks, it can be tagged with a durable label showing the test date, next test due date, and technician’s name. Testing and tagging should be performed regularly to maintain safety and compliance with workplace health and safety regulations.
Optimising your testing and tagging practices by following this process ensures your equipment meets the required safety standards and reduces the risk of electrical hazards in your environment.
Power Board
Testing and tagging power boards is a vital process to ensure the safety of electrical equipment in both homes and workplaces. Power boards, also known as multi-socket adaptors, are frequently used to connect multiple devices to a single power source, making them prone to overloading and electrical faults. According to the NZS 3760 2022 standard, testing and tagging power boards involves inspecting their physical condition, performing electrical safety tests, and labelling them with a tag to confirm they have been checked. Power boards can typically be classified as Class 1 devices, meaning they require earthing due to their exposed conductive parts. Regular testing and tagging help prevent potential hazards like electrical shocks and fires, ensuring the safe and reliable operation of the equipment.

How to Test and Tag a Power Board
To test and tag a power board, follow these steps:
- Visual Inspection: Begin by thoroughly inspecting the power board for any visible damage, such as cracks, burnt marks, frayed cords, or exposed wiring. Check that all sockets are intact and free of any debris or foreign objects. Ensure that the plug is in good condition and that the power board’s cable is securely attached to the plug.
- Earth Continuity Test: For Class 1 power boards, conduct an earth continuity test to ensure the earthing is effective. This test verifies that the earth connection is functioning properly, which is essential for user safety. Using a Portable Appliance Tester (PAT), confirm that the earth resistance is within the acceptable range.
- Insulation Resistance Test: Perform an insulation resistance test to check for any deterioration in the insulation of the power board. This test ensures that there are no faults in the insulation that could lead to electrical leakage or shocks. The insulation resistance should be within the specified limits, usually measured in megohms.
- Polarity Test: Next, perform a polarity test to ensure the correct wiring of live, neutral, and earth connections. Incorrect polarity can result in electrical hazards, so it’s important to confirm that the power board is wired correctly.
- Tagging: Once the tests are completed, label the power board with a tag indicating the date of testing, the name of the technician, and the next scheduled testing date. The tag should also confirm whether the power board has passed or failed the test.
Testing and tagging power boards according to the NZS 3760 2022 standard is essential for maintaining a safe environment in any setting that uses electrical equipment. Power boards are particularly vulnerable to overuse, and regular testing ensures they remain in good working condition, preventing potential electrical hazards.
By adhering to these testing and tagging practices, businesses and households can ensure their power boards are safe, compliant, and capable of supporting their electrical needs without risking safety.
Mobile Charger, Phone Charger, USB Charger, and Travel Charger
Mobile chargers, including phone chargers, USB chargers, and travel chargers, are essential accessories for keeping our devices powered, whether at home, in the office, or on the go. Given their widespread use, ensuring the safety and compliance of these chargers is critical, as they connect to electrical power sources and can pose electrical hazards if not properly maintained. Testing and tagging these chargers involves verifying their adherence to the AS/NZS 3760:2022 standard, which outlines the safety inspection and testing protocols for electrical equipment. Understanding whether a charger is classified as Class I (earthed) or Class II (double insulated) is important, as this determines the required safety measures. Regular testing and tagging not only enhance safety by reducing the risk of electrical faults but also help businesses comply with occupational health and safety regulations.

How to Test and Tag Mobile Chargers, Phone Chargers, USB Chargers, and Travel Chargers
To properly test and tag mobile chargers, phone chargers, USB chargers, and travel chargers, follow these essential steps:
- Visual Inspection: Begin with a thorough visual inspection of each charger. Look for signs of wear and tear, such as frayed cables, damaged connectors, or any visible burns. Ensure that all components, including the plug and USB ports, are intact and functioning correctly.
- Insulation Resistance Test: Conduct an insulation resistance test using an insulation tester. This test checks the effectiveness of the insulation surrounding the conductors. Ensure that the resistance levels meet the required standards outlined in AS/NZS 3760:2022.
- Earth Continuity Test: If the charger is classified as Class I, it is necessary to perform an earth continuity test to verify that the protective earth connection is functioning correctly. This is typically done with a Portable Appliance Tester (PAT).
- Tagging the Charger: After completing the tests and assuming the charger has passed all safety checks, affix a durable, clear tag to the charger. This tag should indicate the date of testing, the next due test date, the technician’s name, and the status of the charger (pass or fail).
By following these steps, you can ensure that mobile chargers, phone chargers, USB chargers, and travel chargers are tested and tagged in accordance with the AS/NZS 3760:2022 standard. This not only promotes electrical safety but also ensures compliance with relevant workplace regulations, helping to protect users and enhance operational efficiency.
Scanner
Scanners are commonly used in various environments, including offices, warehouses, and healthcare facilities, where their functionality is crucial for daily operations. These devices are classified as either Class 1 or Class 2 based on their design and insulation. Class 1 scanners have an earth connection, making them dependent on the grounding system for safety, while Class 2 scanners feature double insulation and do not require an earth connection. The benefits of regular testing and tagging include enhanced workplace safety, compliance with legal requirements, and minimised risk of electrical failures that can lead to accidents.

How to Test and Tag a Scanner
Follow these steps to ensure proper testing and tagging of your scanner.
- Visual Inspection
To test and tag a scanner, start by conducting a thorough visual inspection. This involves checking for any signs of physical damage, such as frayed cables or cracks in the housing. Ensure that the power cord and plug are intact and securely connected. - Electrical Testing
Next, use a portable appliance tester to perform electrical tests. For Class 1 scanners, this will include measuring the earth continuity and insulation resistance, while Class 2 scanners will require only insulation resistance testing. - Tagging
After completing the necessary tests, affix a test and tag label to the scanner, clearly indicating the date of the test, the results, and the technician’s details. This not only shows compliance with the NZS 3760:2022 standard but also assures users of the device’s safety.
By following these guidelines for how to test and tag a scanner, organisations can maintain a safe working environment and ensure that their equipment operates efficiently and safely. Regular testing not only complies with industry standards but also fosters a culture of safety and accountability.
AC Adapter
In today’s electrical environment, the importance of test and tag procedures cannot be overstated. Testing and tagging is crucial for ensuring the safety of electrical appliances and devices, including AC adapters. These items fall under the NZS 3760:2022 standard, which provides guidelines for the periodic testing of electrical equipment to prevent hazards. AC adapters can be classified into two categories: Class I and Class II. Class I devices rely on earth protection, while Class II devices are double-insulated and do not require earthing. Regular testing ensures compliance, minimises risks, and enhances workplace safety. Benefits of effective testing and tagging include reduced liability for businesses, increased safety for users, and adherence to regulatory requirements.

How to Test and Tag an AC Adapter
To properly test and tag an AC adapter, follow these essential steps:
- Visual Inspection: Begin by inspecting the adapter visually for any signs of wear or damage, such as frayed cords or cracks in the casing.
- Insulation Resistance Test: Utilise a portable appliance tester (PAT) to conduct an insulation resistance test and a continuity test for Class I devices.
- Continuity Test for Class I Devices: Ensure that the earth connection is intact and functional.
- Insulation Resistance Test for Class II Devices: For Class II devices, perform an insulation resistance test to ensure there is no leakage current.
- Record Results: After testing, record the results on a tagging label that indicates the date of the test, the next due date, and the tester’s details. This ensures clear communication of the item’s safety status and compliance with the NZS 3760:2022 standard.
By implementing a robust test and tag procedure for AC adapters, you can safeguard users and maintain a safe environment in your workplace. Regular checks not only ensure compliance but also contribute to a culture of safety and responsibility.
Projector
A projector is a vital piece of equipment used in various settings, including offices, classrooms, and event spaces, to display images, videos, and presentations on a large screen or surface. Ensuring the safety and compliance of projectors is crucial, as they are connected to power sources and often used for extended periods. Testing and tagging projectors involves verifying their adherence to the AS/NZS 3760:2022 standard, which outlines the safety inspection and testing protocols for electrical equipment. Understanding whether the projector is classified as Class I (earthed) or Class II (double insulated) is important, as this determines the required safety measures. Regular testing and tagging not only enhance workplace safety by reducing the risk of electrical hazards but also help businesses comply with occupational health and safety regulations.

How to Test and Tag a Projector
To properly test and tag a projector, follow these essential steps:
- Visual Inspection: Begin with a comprehensive visual inspection of the projector. Look for any signs of wear and tear, such as frayed power cords, damaged plugs, or any visible burns. Ensure that all components, including the lens and cooling vents, are intact and free from obstruction.
- Insulation Resistance Test: Conduct an insulation resistance test using an insulation tester. This test checks the effectiveness of the insulation surrounding the conductors. Ensure that the resistance levels meet the required standards outlined in AS/NZS 3760:2022.
- Earth Continuity Test: If the projector is classified as Class I, it is necessary to perform an earth continuity test to verify that the protective earth connection is functioning correctly. This is typically done with a Portable Appliance Tester (PAT).
- Tagging the Projector: After completing the tests and assuming the projector has passed all safety checks, affix a durable, clear tag to the equipment. This tag should indicate the date of testing, the next due test date, the technician’s name, and the status of the equipment (pass or fail).
By following these steps, you can ensure that a projector is tested and tagged in accordance with the AS/NZS 3760:2022 standard. This not only promotes electrical safety but also ensures compliance with relevant workplace regulations, helping to protect employees and enhance operational efficiency.
Paper Shredder
A paper shredder is an essential piece of equipment in offices and homes, providing a secure method for disposing of sensitive documents and protecting confidential information. Ensuring the safety and compliance of paper shredders is crucial, as they operate on electrical power and can pose electrical hazards if not properly maintained. Testing and tagging paper shredders involve verifying their adherence to the AS/NZS 3760:2022 standard, which outlines the safety inspection and testing protocols for electrical equipment. Understanding whether a paper shredder is classified as Class I (earthed) or Class II (double insulated) is important, as this determines the required safety measures. Regular testing and tagging not only enhance workplace safety by reducing the risk of electrical faults but also help businesses comply with occupational health and safety regulations.

How to Test and Tag a Paper Shredder
To properly test and tag a paper shredder, follow these essential steps:
- Visual Inspection: Start with a comprehensive visual inspection of the paper shredder. Look for signs of wear and tear, such as frayed power cords, damaged plugs, or any visible burns. Ensure that all components, including the cutting blades and safety features, are intact and functioning correctly.
- Insulation Resistance Test: Conduct an insulation resistance test using an insulation tester. This test checks the effectiveness of the insulation surrounding the conductors. Ensure that the resistance levels meet the required standards outlined in AS/NZS 3760:2022.
- Earth Continuity Test: If the paper shredder is classified as Class I, it is necessary to perform an earth continuity test to verify that the protective earth connection is functioning correctly. This is typically done with a Portable Appliance Tester (PAT).
- Tagging the Shredder: After completing the tests and assuming the paper shredder has passed all safety checks, affix a durable, clear tag to the equipment. This tag should indicate the date of testing, the next due test date, the technician’s name, and the status of the equipment (pass or fail).
By following these steps, you can ensure that a paper shredder is tested and tagged in accordance with the AS/NZS 3760:2022 standard. This not only promotes electrical safety but also ensures compliance with relevant workplace regulations, helping to protect users and enhance operational efficiency.
Radio
A radio is a widely used electronic device for communication, entertainment, and information dissemination, found in homes, offices, and vehicles. Ensuring the safety and compliance of radios is critical, as they operate on electrical power and may be used for extended periods. Testing and tagging radios involves verifying their adherence to the AS/NZS 3760:2022 standard, which outlines the safety inspection and testing protocols for electrical equipment. Understanding whether the radio is classified as Class I (earthed) or Class II (double insulated) is important, as this determines the required safety measures. Regular testing and tagging not only enhance workplace safety by reducing the risk of electrical hazards but also help businesses comply with occupational health and safety regulations.
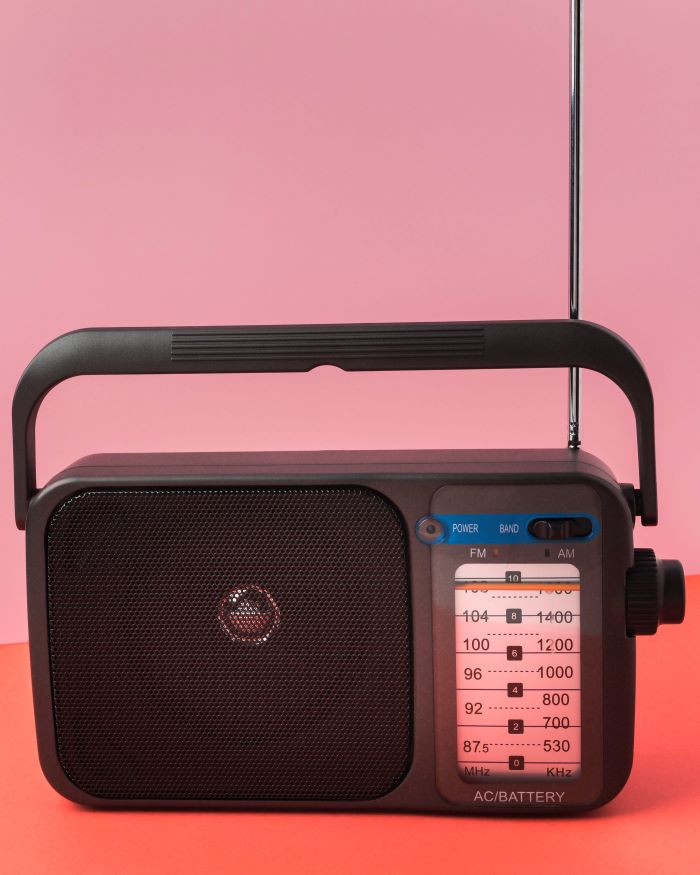
How to Test and Tag a Radio
To properly test and tag a radio, follow these essential steps:
- Visual Inspection: Begin with a comprehensive visual inspection of the radio. Look for any signs of wear and tear, such as frayed power cords, damaged plugs, or any visible burns. Ensure that all controls, speakers, and antennae are intact and functioning properly.
- Insulation Resistance Test: Conduct an insulation resistance test using an insulation tester. This test checks the effectiveness of the insulation surrounding the conductors. Ensure that the resistance levels meet the required standards outlined in AS/NZS 3760:2022.
- Earth Continuity Test: If the radio is classified as Class I, it is necessary to perform an earth continuity test to verify that the protective earth connection is functioning correctly. This is typically done with a Portable Appliance Tester (PAT).
- Tagging the Radio: After completing the tests and assuming the radio has passed all safety checks, affix a durable, clear tag to the equipment. This tag should indicate the date of testing, the next due test date, the technician’s name, and the status of the equipment (pass or fail).
By following these steps, you can ensure that a radio is tested and tagged in accordance with the AS/NZS 3760:2022 standard. This not only promotes electrical safety but also ensures compliance with relevant workplace regulations, helping to protect employees and enhance operational efficiency.
Laminator
A laminator is an essential piece of equipment in offices, schools, and various industries, used to protect documents and create durable finishes on printed materials. This device operates by applying heat and pressure to laminate sheets, making it crucial to ensure its safety and compliance with electrical standards. Testing and tagging laminators involve verifying their adherence to the AS/NZS 3760:2022 standard, which outlines the safety inspection and testing protocols for electrical equipment. Understanding whether the laminator is classified as Class I (earthed) or Class II (double insulated) is important, as this determines the required safety measures. Regular testing and tagging enhance workplace safety by reducing the risk of electrical hazards and help businesses comply with occupational health and safety regulations.

How to Test and Tag a Laminator
To test and tag a laminator, follow these steps:
- Visual Inspection: Start with a comprehensive visual inspection of the laminator. Look for any signs of wear and tear, such as frayed cords, damaged plugs, or any visible burns. Ensure that all components are intact and secure.
- Insulation Resistance Test: Conduct an insulation resistance test using an insulation tester. This test checks the effectiveness of the insulation surrounding the conductors. Ensure that the resistance levels meet the required standards outlined in AS/NZS 3760:2022.
- Earth Continuity Test: If the laminator is classified as Class I, it is necessary to perform an earth continuity test to verify that the protective earth connection is functioning correctly. This is typically done with a Portable Appliance Tester (PAT).
- Polarity Test: Ensure that the active, neutral, and earth connections are correctly wired within the plug. A polarity test can help identify any miswiring that could pose safety risks.
- Tagging the Laminator: After completing the tests, and assuming the laminator has passed all safety checks, affix a durable, clear tag to the equipment. This tag should indicate the date of testing, the next due test date, the technician’s name, and the status of the equipment (pass or fail).
By following these steps, you can ensure that a laminator is tested and tagged in accordance with the AS/NZS 3760:2022 standard. This not only promotes electrical safety but also ensures compliance with relevant workplace regulations, helping to protect employees and enhance operational efficiency.
Contact Go Test and Tag for Professional Testing and Tagging Services
Regular testing and tagging of office equipment is vital for maintaining a safe and compliant workplace. By implementing the procedures outlined in this guide, businesses can protect their staff and prolong the lifespan of their devices. For expert assistance and to receive a customised quote tailored to your needs, visit Go Test and Tag today. Our skilled team is dedicated to helping you meet your safety obligations and ensuring that your equipment is always up to standard. Contact us now to enhance the safety of your workplace with reliable testing and tagging services!